How to use the CCP4 graphical user interface
From Media Wiki
Contents |
[edit] CCP4i Reference
The reference for CCP4i is:
E. Potterton, P. Briggs, M. Turkenburg and E. Dodson, Acta Cryst. (2003). D59, 1131-1137 "A graphical user interface to the CCP4 program suite"
[edit] Getting Started
To run the Interface you must have the standard CCP4 program setup - it will stop with a warning message if it can not find CCP4 programs and data files! Then type:
ccp4i
[edit] Documentation and Help
There are various levels of documentation in and around the Interface:
- Full documentation - The full documentation can be read starting from Welcome to the CCP4 Task Interface.
- 'Help' button - There is a Help button at the top right of most Interface windows. Clicking in this brings up a Netscape window with a help page describing that window.
- 'Message line help' - As you move the mouse about a window, you will notice that when the cursor is over an entry widget (either a field you can type into, or a menu or button), some explanation of that widget is flashed in the message line, which is the gold-coloured bar at the top of the window.
- 'Bubble help' - this displays the same help text as the 'message line help' above, however the text is shown in a bubble which appears next to the widget in question after a short time-delay. This is in addition to the message line, but can be turned off if the user finds it too distracting.
- 'Right mouse button help' - For more information on a specific entry widget you can click on it with the right mouse button. This will bring up a Netscape window displaying help text for that window and positioned at the explanation for that widget.
[edit] Directories & Project Directory
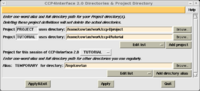
The first time you run the Interface, the window which enables you to set up directory aliases and define a project directory comes up automatically (right). Alternatively it can be accessed via the "Directories & ProjectDir" button near the top right of the main window.
The CCP4 Interface is designed with the expectation that all data files relating to one crystallographic project will be in one directory. It is simple to override this but it may be helpful to organise all CCP4 work this way. You may have more than one project, and it is easy to switch between projects inside the Interface.
In the Directories&ProjectDir window, enter one-word aliases and the full pathname for the directories you use regularly. These directories can then be accessed quickly when selecting files via a menu that lists your directory aliases and goes straight to the directory you choose. The window allows distinction between two types of directories:
- those that contain everything to do with one project (i.e. the Project directories), to be entered with the Add project button. One of these directories should be selected as your current Project directory. Use the pop-up menu to select from a list of the defined project directory aliases.
- those that contain any other information you may want to use regularly, e.g. CCP4 example areas, which can be entered with the Add directory alias. In many cases, these will be directories you do not 'own' personally.
The Interface will automatically create a subdirectory of your project directory called CCP4_DATABASE. This is where the Interface stores its database for the project.
[edit] The Main Window
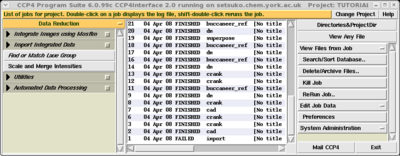
The main window is composed of windows, menus and buttons. Apart from the gold-coloured bar at the top, which is reserved for HELP (see above), these are as follows (from top left to bottom right): bullet Choose module menu bar - with a pop-up menu for the modules of the Interface. Linked to each module are a set of tasks, displayed in the: bullet Tasks menu - scrollable list of tasks connected with a module. bullet Job List window - with a list of the jobs run via the Interface. Jobs can be selected and deselected by clicking on the relevant line in the job list. All jobs can be deselected by pressing the F2 function key. This job list is the main Interface to The Database Utility. bullet Directories&ProjectDir button - to choose the directory for the current project, and other directories (see above). bullet Change Projects button - gives a menu of the current list of existing projects. By selecting one you can change directly to a new project and therefore see the list of jobs within that project. bullet View Any File button - to select and view any file using The FileViewer Utility.
To use the following Database Options, you must first select a job from the job list. A more detailed description of The Database Utility can be found elsewhere.
- View Files From Job menu bar - with a pop-up menu to select the log file or one of the input or output files from the job, to be displayed with The FileViewer Utility. If the file is in HTML format, you will be given the option to View File in Netscape, which will display the log file with links to documentation and in-line graphs. Note that there may be some delay as Netscape first loads the Java applet to display graphs. If the log file contains summary tags, you will have the option to display just the summary.
The menu also has the option to:- View LogFile in Web Browser - to view HTML format log file directly in browser
- View LogSummary in Web Browser - to view only the summary from a HTML format log file in browser
- View Log Graphs - to view the tables in the log file with The Loggraph Utility.
- View Command Scripts - to display the input to the CCP4 programs.
- Search/Sort Database button - to perform a search on the information in the job database, or display the joblist sorted on various criteria. A more detailed description can be found elsewhere.
- Delete/Archive Files button - to delete or archive the output files from selected job(s).
- Kill Job button - to kill the selected job (one job only can be killed in one action). You will be asked to confirm, before the job is actually killed.
- ReRun Job button - to rerun a selected job, with an option to review and change parameters used in the previous run.
- Edit Job Data menu bar - with a pop-up menu. To edit any notebook data produced with CCP4 (or related) programs. The menu has the options to:
- Read/Edit Notebook
- Edit Job Data
- Enter Data for External Job
- Preferences button - to change Interface defaults, e.g. for where output files go. A more detailed description can be found elsewhere.
- System Administration menu bar - with a pop-up menu. To assist with setting up and extending CCP4i. The menu has the options to:
- View Session Log - The Interface keeps a log of the session (e.g. jobs run and files deleted) and error messages. This option will display the session log.
- Configure Interface - This gives a window to define utilities like printers and remote machines. They should have been set up when your CCP4i was installed. See also Configuration.
- Install New Tasks - This gives a window to copy new task definitions (from a Task source) into the current installation. See also Install New Task.
- Run Tests - To aid program developers in rerunning test jobs.
- Mail CCP4 button - brings up a window to enter a message (comments, questions, problems) to ccp4gui@dl.ac.uk. The message will be mailed immediately when SEND is pressed.
bullet Exit button - to exit the Interface.
The main window can be resized to alter the size of the windows and menus, which also have scroll bars.
[edit] Modules and Tasks
The Interface will run most frequently used programs from the CCP4 suite but is organised around the idea of tasks rather than programs. Usually one task corresponds to one program but sometimes more than one program may be required to perform a task or a program may be used in different tasks. The tasks are grouped into modules according to the stage in the crystallographic process they are used in (e.g. Density Improvement and Refinement are two separate modules) and three utility modules which contain tools which apply to the three main types of data (i.e. Map & Mask Utilities, Reflection Data Utilities and Coordinate Utilities). There is also a Program List 'module' which has an alphabetic list of interfaced programs.
The name of the current open module is in the Choose module menu bar on the upper left of the main Interface window in a gold colour (the background colour of the documentation you are now reading). To use the pop-up menu:
- Hold the left mouse button down over the name of the current open module.
- Move and release the mouse button over the desired module to open.
A scrollable list of tasks will appear beneath the name of the module. Click on the task name to open the task window. Only one instance of each task window can be open at a time but windows for different tasks can be open simultaneously.
Note that some tasks may be disabled - this is indicated by the text on the button being "greyed out", by the fact that the button doesn't function, and by the text "disabled" appended to the end of the task description. Tasks are disabled in this fashion when explicit dependencies for the task (for example the presence of certain programs) are not found.
More detailed information about the dependencies, and how to obtain and install them, is given in the Additional Programs section.
[edit] Task Window Format
All of the task windows have a common format.
Each task window is divided horizontally into sections called folders. In general, the folders may be open so that you can see the contents, or closed so that only the title line is visible. Folder status is indicated by the small square button on the right hand side; it can be toggled open and closed by clicking anywhere on the title line.
The top two folders of a task window can not be closed, and are always:
[edit] The Protocol folder
[edit] The Files folder
The file selection and MTZ column selection options have a common format in all the task windows. The input file selection is above the output file selection. After selecting the input file a reasonable name is automatically derived for the output file. This output name can be changed if desired.
Where appropriate an input file is read automatically and data are extracted to provide reasonable defaults for some options and to simplify selection of MTZ column data. You may notice a pause after entering a file name while the file header is read.
The number and contents of the other folders will be dependent on the task, and folders which contain less commonly used options will be closed by default.
At the bottom of the task window are options for saving and restoring parameters (Save or Restore) and for running the task (Run).
[edit] File selection
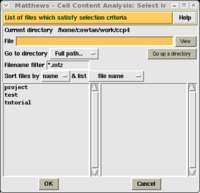
The Interface makes assumptions about where input files will be (in the Project directory) and where output files should go (either the Project directory or TEMPORARY for large or temporary files). The TEMPORARY directory is the CCP4 program scratch directory usually defined by your installation, but this can be changed in the Directories/ProjectDir window. These defaults/assumptions can be overridden using the following widgets:
- Default directory menu
The pop-up menu has a list of the defined directory aliases and the options of the CURRENT directory and the TEMPORARY directory.
- File name entry
You can type in the name of the file. If no directory path is specified, the file is expected to be in the default directory. If you select a file which is not in the default directory, then its full path name will be displayed. Otherwise only the file name, without the path, is displayed.
- Browse button
Click this to open a File Selection window to select the file. A detailed description of File Selection can be found elsewhere.
- View button
When this is clicked, the selected file is listed to a separate viewing window by The FileViewer Utility.
In addition to (and as an alternative to) these widgets, you can use the File Name Completion feature. Typing the initial letters of a file name (wildcards accepted) and pressing the [Return]/[Enter] button will bring up a window listing all files whose names begin with those letters, one of which can be selected. The MTZ column selection line:
Each column selection line will allow selection of one or two sets of column data. Where there is the option to select two sets, the second set is a Sigma or Weight for the first set.
Input column data has a default selection of "Unassigned" until the input file is selected. Then the column data is read automatically from the file, and a pop-up menu, listing the names of all column data of suitable data type, is created. At the bottom of the menu list is a List All Labels option which will list all the column labels (it may be necessary to use this if your columns do not have correct types).
Sigma or Weight column data in an MTZ file are assumed to be associated with the preceding data column. Where there is no such data in the MTZ file, an "Unassigned" option will appear in the menu. When you change the F or Phi column selection, the Sigma or Weight selection will be updated automatically.
Most programs do not have fixed requirements on column data input. The Interface usually has options in the Protocol folder for you to specify what you are trying to do and it will then provide the fields to enter the necessary column labels. Usually the first item on the column label line is compulsory but the Sigma or Weight may be optional and can be left as a blank or as "Unassigned".
[edit] Further information
CCP4i and most of the content of this page by Liz Potterton, Peter Briggs.