Contents
IntroductionChanging the 'standard' colour schemes
Creating a customised colouring scheme
Colouring Hints
 |
CCP4 Molecular Graphics Tutorials | |
| Atom Colouring |
| Documentation Contents | On-line Documentation | Tutorials | CCP4mg Home |
This documentation page has not been updated for CCP4mg 2.0. The page will be updated soon and will be available as part of the programs automatic update. If you have any queries meantime please contact ccp4mg@ccp4.ac.uk
Making pictures can take a lot of time and much of that time is in selecting what to include in the picture - using the programs selection tools effectively can help save a lot of that time. The representation of a model can be built up from multiple model display objects. All of the atoms in one display object must obey the same colouring scheme rules and will have the same display style (e.g. 'ribbons' or 'cylinders'). This tutorial is complementary to the Selection tutorial.
Load a model (for example try dUTPase from the tutorial data). It will look nice drawn as Ribbons. The model is a trimer with three bound ligands. Add another model object (click on the model icon, the dot by the model name, and select Add model display object) and for this object click on the Atom selection and select ..and monomers.. and select All to select all of the ligands. Click on the model display object icon ![]() and select Show and also set the display style to Spheres.
and select Show and also set the display style to Spheres.
The DUX ligand contains an atom of fluorine which is currently coloured white in the 'Atom type' colouring scheme. This could be changed by opening the Preferences window (from bottom of the Tools pull down menu) and selecting Atom type from the Model colours folder. To add a colour for fluorine click on the Add range/colour button and enter ' F' in the type column and choose a colour (I have used cyan). Close this window.
The Model colours preferences change the standard colour schemes which are on the Colour scheme menu for all models. The next section shows how to set up a novel colouring scheme.
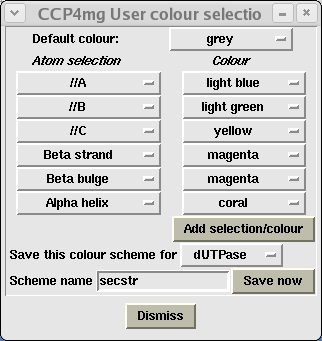
Models are loaded with the default colour scheme 'Atom type' - try changing this to Secondary Structure and then pick Edit colour scheme... In the new window you can customise the colour scheme stating from the default colouring by secondary structure. For example you might want to set the Beta bulge which are currently green to the same colour as the beta strands and you may decide to not colour the different turns - these lines can be removed from the table by clicking with the right mouse button on either of the menubuttons in the line and selecting Delete selection/colour. Note that many tables in the interface have the same functionality on a 'right mouse menu'. You can also change the colours of course. Then to save your colour scheme enter a one word name in the Scheme name line and click on the Save now button. By default this colour scheme will only be available for the dUTPase model; the information is saved in a file called dUTPase.ccp4mg and is reloaded next time you load the same model. If you want the colour scheme to be available for all models then click on the menu labelled Save the colour scheme for and change to all models. If you now Close this window and change the colour scheme to something else you can later restore the saved scheme using the Restore colour scheme option.

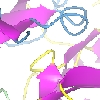
To create the image above with the loop regions coloured differently for each of the three chains you need to to put the rules for colouring the chains (e.g. 'chain A is coloured yellow') before the rules for colouring the helices and strands so in the Edit colour scheme.. interface click on the line labelled 'beta strand' and use the 'right mouse menu' option to Insert above and create two new rows. Then click in turn on the buttons currently labelled 'No structure' and 'All atoms' and choose ..of chain.. and select chains A, B and C for the three rules and then select a colour for each of them. So the window looks like this
While the Edit colour scheme window try clicking on an atom with the right mouse button depressed. The menu which appears has options to reset the colour for the picked atom, residue or secondary structure element. Also try selecting the option Residue range from and then right-mouse click on another residue and select the Residue range from your first residue and select a new colour. The range of residues will be recoloured and a new line will appear at the bottom of the Edit colour scheme window showing the new colour rule for the range of residues; you can click on the selection button, which is labelled Ranges etc. and pick one of the options Main chain, Side chain or CA trace to limit the selection to these residues within the range.
If you want to change the defined colours or define new colours then either: