 |
CCP4 Molecular Graphics Tutorials |
 |
| Ligand Binding Site Selection |
This documentation page has not been updated for CCP4mg 2.0.
The page will be updated soon and will be available as part of the
programs automatic update. If you have any queries meantime please contact
ccp4mg@ccp4.ac.uk
Introduction
Making pictures can take a lot of time and much of that time is in selecting what to include in the picture and choosing the colouring - using the programs selection tools effectively can help save a lot of that time. The representation of a model is built up from several model display objects. All of the atoms in one display object must obey the same colouring scheme rules and will have the same display style (e.g. 'ribbons' or 'cylinders'). This tutorial is complementary to the Colouring tutorial. The quickest way to set up a complex picture is using the Picture Wizard, which creates the display objects for you but this tutorial explains the background for customising the Picture wizard pictures.
Simple menu-based selection
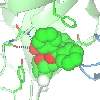
Load dUTPase (with the Representation style in the coordinate file selection window set to All atoms) and try to create a picture of the ligand binding site of one of the three homologous ligands. Create additional model objects by clicking on the model icon, the dot by the model name, and selecting Add model display object. Set up three model display objects; one for the monomer //D/1(DUX) and the other two containing the B and C chains. You can choose how to display and colour these objects but for example the setup
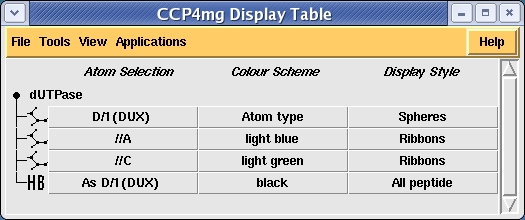
gives the image
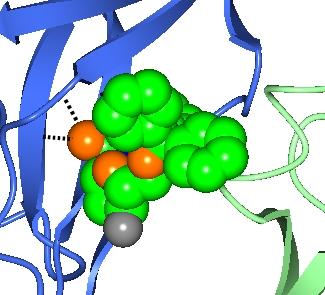
The ligand D/1(DUX) is selected for the first object by using the ..and monomers.. selection menu item and selecting the D/1(DUX) from the submenu. The A and C chains are selected using the ..of chains.. selection menu item and selecting the appropriate chain from the submenu.
Also shown here are the hydrogen bonds between the ligand and the protein by selecting Add display object and Hydrogen bonds from the model icon menu and then limiting the display to hydrogen bonds between two sets of atoms. The first set is selected in the first column of the hydrogen bond display object - choose the monomer //D/1(DUX) and the second set, selected in the third column, is All peptide.
Copying selection to another model
Load the model 1snf which is a homolog of dUTPase. From the model icon menu (the dot next to the model name) select Display same as and dUTPase. The current display setup for dUTPase will be copied to 1snf. The 1snf has different ligands and so the display object selections which require the name of the ligand need to be entered again: for the first display object and the hydrogen bonds object select ..and monomers and //1170(UMP)
In future we do intend to make the 'Copy from' tool smarter so it will recognise equivalent ligands and residues. You can delete or hide the 1snf model; it will not be used again.
'Neighbourhood' to select active site residues
Create another model object for dUTPase and, from the Selection menu, pick Neighbourhood of. A new window appears. In the top line of this window you select the 'central' atoms whose neighbours will be found. From the or monomers menu select D/1(DUX). By default the selection group (fourth line of window) should be residues - change this to main/side chain so that if a side chain atom is close to the ligand all of the side chain is selected and if a main chain atom is close then all of the main chain of that residue is selected. Set Radius to 4.0 (Å). Click Apply.
Make the display object visible and display style Cylinders. The side chains of the active site are displayed.
For your picture you may choose to add or remove some side chains or main chain atoms - the interactive selection tools, described in the next section, could be applied with the 'neighbourhood' selection as a starting point. But in the example below it is not used so make this display object invisible to avoid confusion.
Interactive selection
To manually choose the residues of the active site create another model display object, make it visible and initialise the selection to no atoms by clicking No atoms on the selection menu. Then, from the bottom of the selection menu, pick Interactive selection and Simple. A new, temporary, object appears on the display which is a thin bonds display of all atoms in the model and you can click on items in this display to select them for permanent display. It is probably easier if you Hide the two ribbon objects for now. If you look around the ligand you will see hydrogen bonds to the main chain atoms of residues C/115 to C/117. To select this section of chain for display click on one atom in each residue with the RIGHT mouse button and from the popup menu pick Select this.. and main chain. The selected atoms will be displayed with fat bonds. Other residues whose side chains might be selected are C/113(ASN) which forms a hydrogen bond to the ligand and C/112(TYR) and C/46(PHE) whose aromatic rings stack against the ligand. When happy with the selection go to Interactive selection again and switch off. The temporary thin bond object will disappear and the newly selected residues can be changed to a nicer display style such are Cylinders. The ribbons can be switched back on. A couple of final refinements..
the colour of the side chains can be set to the same colour as the C chain ribbon but check the option Non-carbon by atom type on the colour menu
the hydrogen bonds can be fatter - from the hydrogen bond icon menu  select Line width and set to 4.
A final image might look like this.

Picture Wizard
To create a similar scene automatically open the Picture wizard from the Applications pull-down menu. From the Style folder menu on the Picture wizard menu bar select ligand binding site. A series of ligand binding site scenes are shown; try the site_and_ribbons picture style by clicking on the Create picture button for that scene. A new window appears: make sure that the selected model is pUTPase and for the first ligand select D/1(DUX) then click the Create picture button. The scene in the display window will be redrawn; click the Notes button for the site_and_ribbons picture style to get an explanation of the picture.