Contents
View pull-down menu optionsTransparency
Rotate/translate/align view
RocknRoll
 |
CCP4 Molecular Graphics Documentation | |
| View Menu |
| Documentation Contents | On-line Documentation | Tutorials | CCP4mg Home |
This documentation page has not been updated for CCP4mg 2.0. The page will be updated soon and will be available as part of the programs automatic update. If you have any queries meantime please contact ccp4mg@ccp4.ac.uk
Preferences for the tools on this menu can be found in the Preferences window (on the Tools pull-down menu), in the Display folder click View menu preferences.
Stereo can be toggled on/off. The stereo mode can be selected
in the Preferences. The stereo angle can be set; the default value (for CCP4mg 1.1) of -6 degrees gives wall-eye stereo or a positive value gives cross-eye stereo.
Show axes Show the axes in top right corner of display window
Depth queue fog Fogging distant objects creates the illusion of depth.
The fog density is graded between the front and back clipping planes and
the density can be altered by opening the Clip plane/depth cue slider described below. Also the default of applying fogging to text labels can be switched off in the Preferences window.
Clip planes are two planes perpendicular to the z-direction (i.e. the planes are parallel to the screen);
only objects between the front and back clipping plane are displayed.
Limiting the display in the z-direction simplifies the
picture when you are trying to focus on a small area.
The clip plane separation is controlled by moving the cursor up-down with the h-key and th middle mouse button depressed. It can also be controlled by..
Clip plane/depth cue slider If toggled on a panel is opened at the bottom of the main graphics window with sliders controlling the clip plane separation and fog thickness.
Background colour can be selected from the defined colours.
Lighting style See lighting.
Set transparency A window like this is shown:
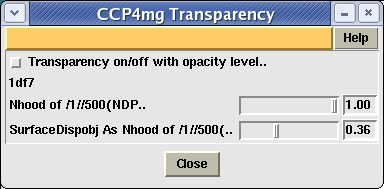
All of the display objects are listed and initially have opacity set to 1.0 in a range of 0.0-1.0 (i.e. they are totally opaque) - setting this to 0.1-0.4 will make objects transparent. Transparency is not applied until the Transparency on/off button at the top of the window is toggled on. Note that drawing transparent objects is slow and proportional to the total displayed and not just the size of the transparent object.
Compact display table Toggling this on will remove the display objects from the display table so only the data objects are listed. Clicking on the data object line in the table will toggle the listing of its display objects.
View from
Reorients the display to view from left,right,top,bottom or back.
Save view or Restore view to file, similar to saving the program status.
Align view on click this button after selecting a plane from the menu.
Sliders to set specific translation, rotation and zoom. Click the Apply button to apply.
The rock and roll parameters can be changed in the Preferences window in the Behaviour folder.
Rock Continuously rocks the display until you click the Stop rocking button at the top of the main graphics window or the display table. The rock axis, time period and angle can be set and the roll axis and roll rate can be set in the Preferences.
Roll Continuously rotates the display until you click the Stop rolling button at the top of the main graphics window or the display table. The rotation axis and the roll rate (the angle (in degrees) that the orientation is changed for each step can be set in the Preferences.